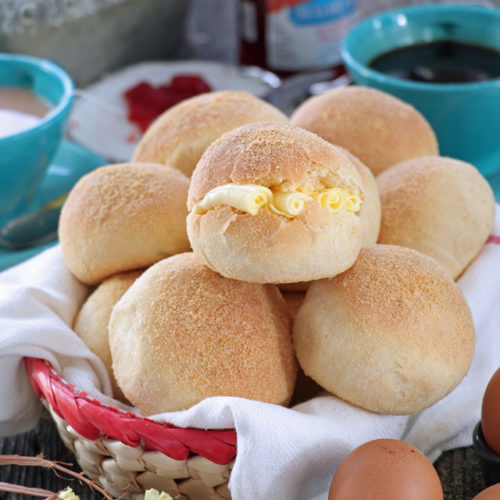
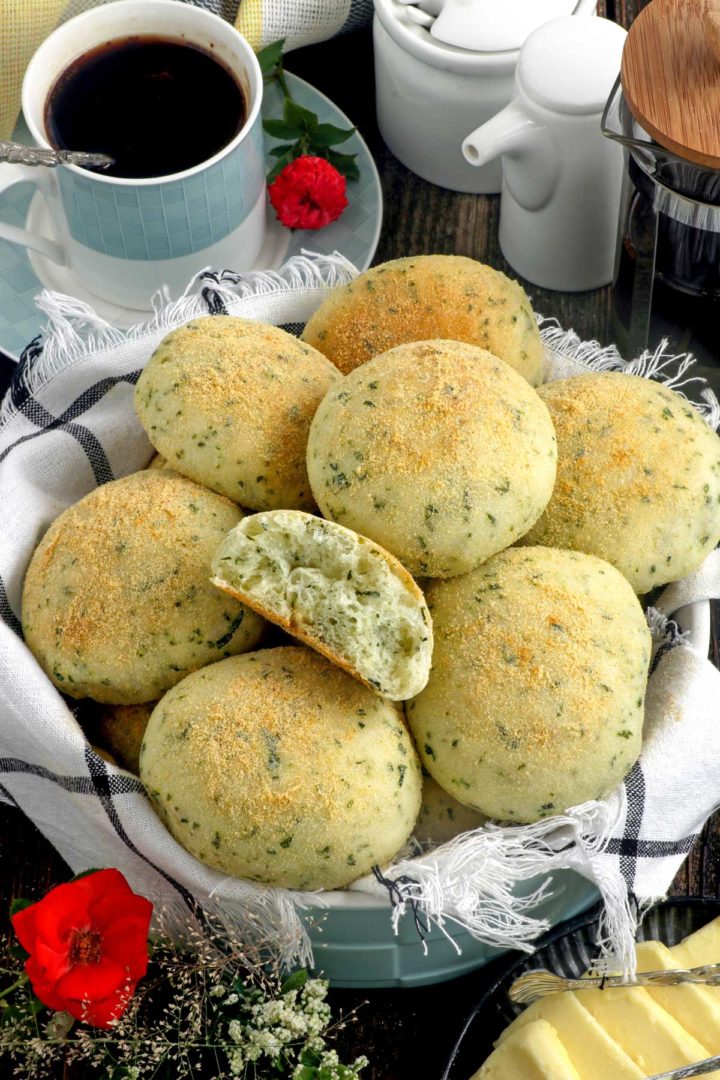
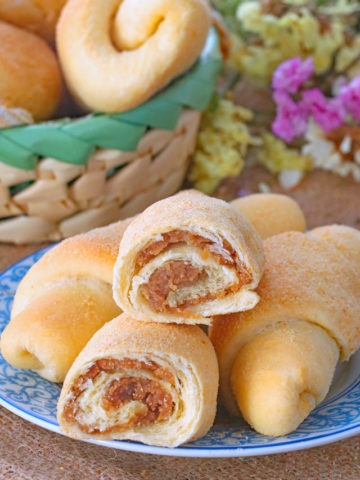
Pandesal is a classic Filipino bread roll that is particularly eaten for breakfast. It is soft and airy and slightly sweet. Normally eaten as a sandwich with one's favorite filling.
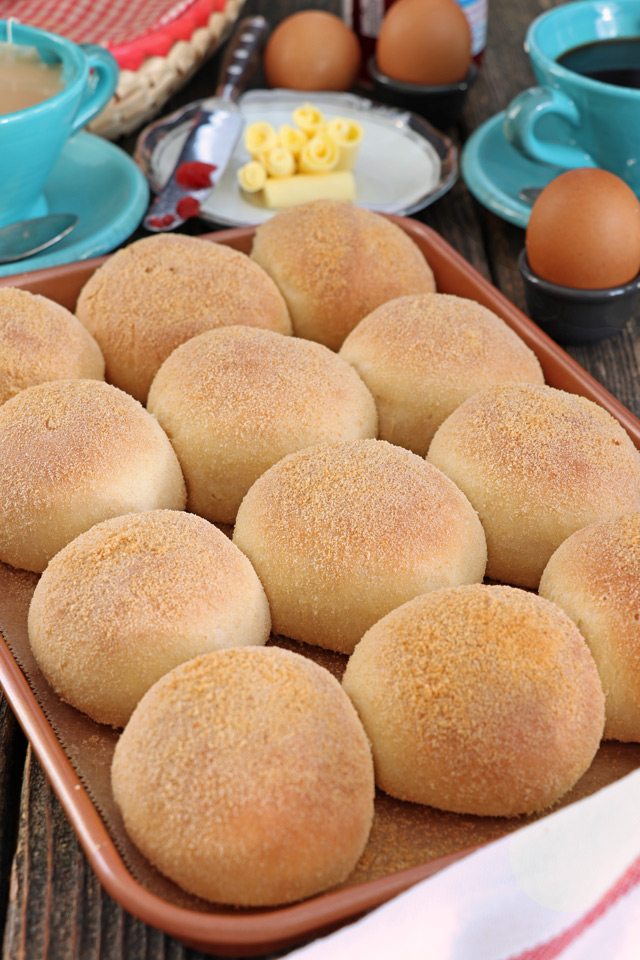
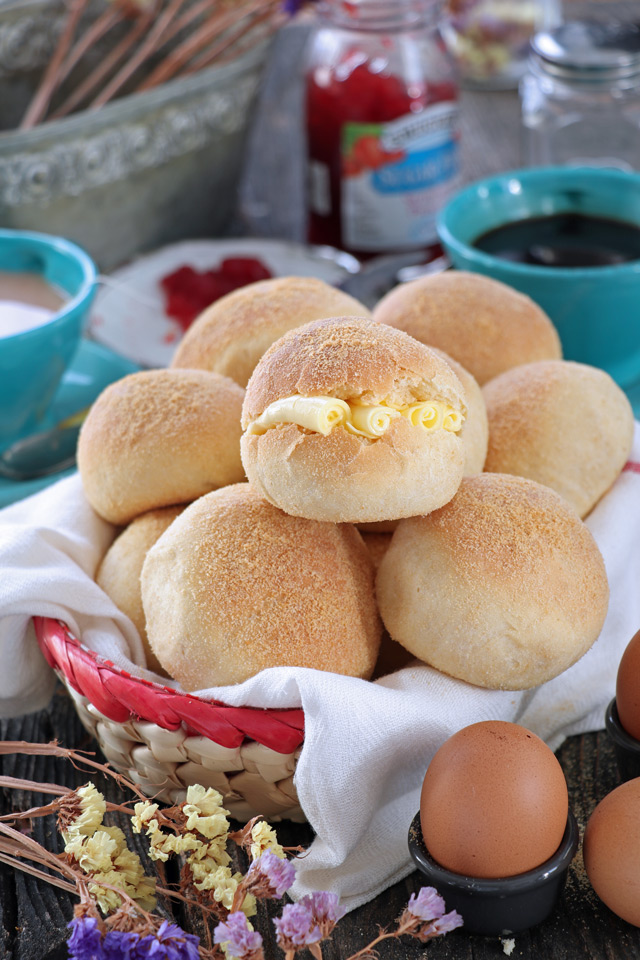
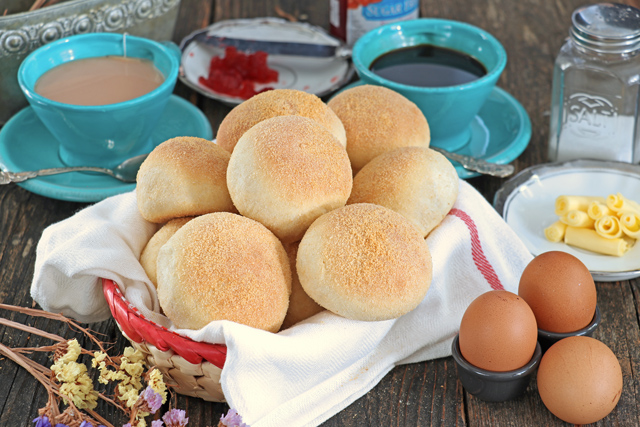
Pandesal is probably the most popular bread in the Philippines. It is a favorite breakfast that can be eaten on its own, dunked in coffee or with filling like coconut jam, peanut butter, cheese, cheese spread, corned beef, egg, hotdogs or practically anything you can think of or whatever leftovers you have laying in your fridge.
One of my faves is mushed spicy sardines...yup! But I remembered a time when we were just small kids, my Kuya Norman's and I would have ketchup with sugar as filling...eeewww, right? But that tasted so good to us at that time! Haha! Yeah, I have to admit I tried a lot of weird stuff just because my big brother thinks it is good or cool. Hehe!
What is Pandesal?
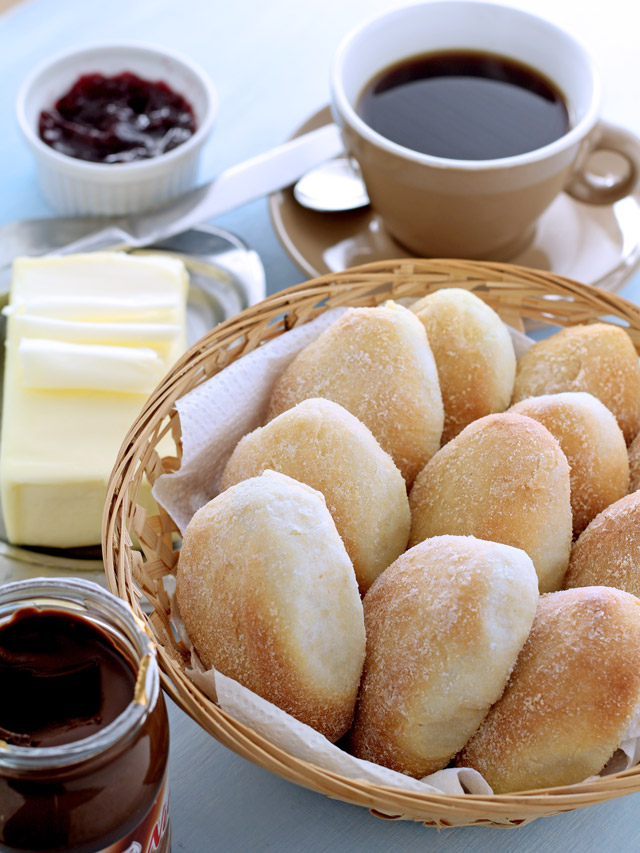
A traditional Filipino breakfast roll, that used to be sold only in early hours at bakeries or on the streets by vendors on bicycles with loud air horns. They would put the Pandesals in a big insulated box to keep them warm. But, nowadays, some bakeries make them available for the entire day.
It is called Pandesal or Pan de Sal (Spanish) that translates to salted bread although it is actually sweeter than salty. It is soft and fluffy and covered with breadcrumbs.

What are the Ingredients for Pandesal?
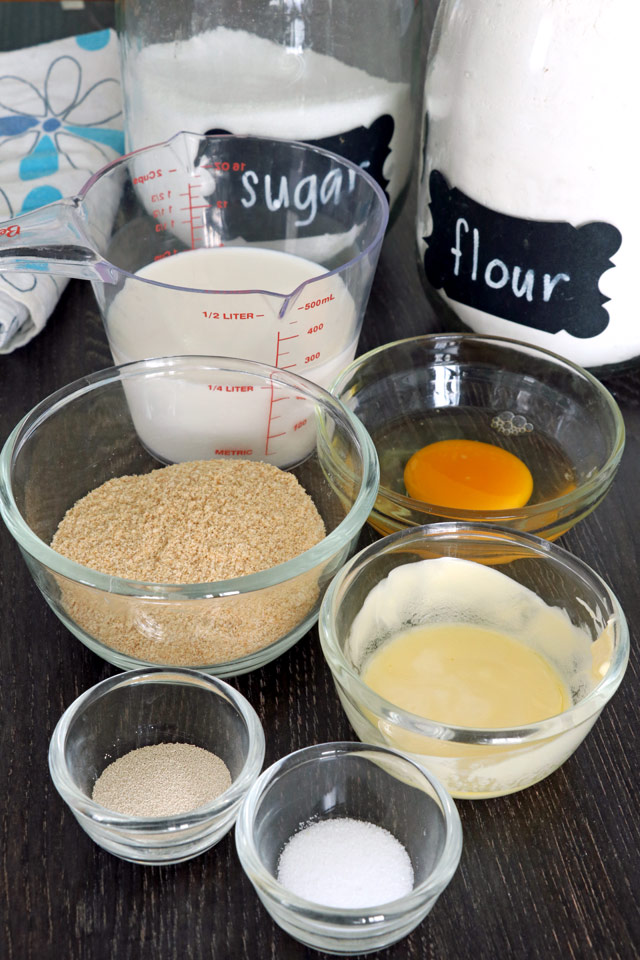
Basically, you can already make pandesal with just 5 ingredients: flour, yeast, oil or lard, sugar, and salt. Six if you have to include water.
This recipe replaces the water with milk and adds eggs. Both of them giving these pandesals a softer texture, both inside and to the crust, and gives a richer flavor. The eggs also help the dough rise higher.
I also use butter or sometimes margarine that adds that delicious buttery goodness.
A note about flour...
The original recipe I posted here in 2015 was made when we were still living in Germany. When I used the same recipe here in the Philippines, the outcome is different. They taste great but were a little denser and dryer.
This is because of the flour used. The flour that I used in Germany is finer or "softer" which tends to absorb lesser liquid. The recipe (way) below is the original recipe I used for that. The flour I usually use in the Philippines is similar to the ones in the US, Gold Medal APF. This one requires more liquid so I adjusted the recipe here.
Remember—different types of flour has different flour-to-water ratio. The higher the protein/gluten content, the more water it needs. Also important to note, not all-purpose flour acts the same. Different brands have different ways of processing their flour and different contents.
If the dough feels too dry then simply add more water, or if too sticky then add flour. The dough should feel pliable or easy to knead and not too sticky.
You can also use bread flour if you are looking for a chewier pandesal. Mix them in equal parts to get a moderately chewy but softer ones. But remember that bread flour absorbs more liquids so you may need to adjust.
Other Filipino Bread Recipe to Try:
- Spanish Bread - Similar to Pandesal but with a sweet buttery filling
- Cheese Bread - Sweet dough bread covered in milky streusel
- Ensaymada - pillowy bread topped with buttercream and grated cheese
How to Make Pandesal
Printable Recipe
Pandesal Recipe - Soft and Buttery
Ingredients
- 3 cups all-purpose flour - see NOTE 1 about bread flour
- ¼ cup sugar
- 1 teaspoon salt
- 1 cup milk - lukewarm
- 1 egg
- 2 tablespoon butter - melted (or margarine)
- 1 ½ teaspoon instant dry yeast - see Note 2
- ¼ cup breadcrumbs
Instructions
- In a big bowl, mix together flour, sugar, salt.
- Pour in milk, beaten egg and melted butter. Mix several times until well blended. Make sure that the milk is only mildly warm and not hot.
- Add the instant dry yeast and fold until a sticky dough forms.
- Tip the dough on a floured surface and knead until it becomes smooth and elastic, about 5-10 minutes.
- Form the dough into a ball and lightly coat with oil. Place it in a bowl and cover with a kitchen towel or plastic wrap and place it in a warm area and let it rise until it doubled in size. Depending how warm it is, could take 30 minutes to an hour.
- Punch down the dough and divide into 2 equal parts using a knife or dough slicer. Roll each into a log. Cut each log into 6 smaller pieces.
- Shape each piece into a ball and roll it in breadcrumbs, completely covering all sides.
- Arrange the pieces on a baking sheet leaving some gaps in between (at least an inch). Leave them to rise second time until double in size.
- While waiting, preheat oven 370° F /185°C. Bake the Pandesal for 15 minutes or until the sides are a bit browned.
- Remove from oven and serve while hot!
Notes
Nutrition
This post was originally published in September 2015. Updated to include new images and some improvements on the recipe.
For those who still want to use the old recipe, here it is. The main difference is the shaping of the individual rolls. The old version is the traditional pandesal shape that is slightly elongated with pointy ends.
3 cups flour
1 ½ teaspoon instant dry yeast
¼ cup + 1 tablespoon sugar
1 teaspoon salt
¾ cup milk
3 tablespoon margarine - or butter (melted)
1 egg
½ cup breadcrumbs
In a big bowl, mix together flour and yeast. In a smaller bowl, combine sugar, salt, milk and margarine or butter. Warm liquids in the microwave until warm. Remove from microwave and add the egg and beat several times until well blended. Make sure that the liquids are only mildly warm and not hot.
Pour the liquid mixture over the flour mixture and fold until dough forms. Knead the dough on a clean surface dusted with flour until it becomes smooth and elastic, about 5-10 minutes.
Form the dough into a ball and place the dough in a greased bowl and cover with a kitchen towel or plastic wrap and place it in a warm area and let it rise until it doubled in size. Depending on how warm it is, could take 30 minutes to an hour.
Punch down the dough and divide it into 2 equal parts using a knife or dough slicer. Roll each into a log. Cover each log with breadcrumbs. Cut the log sideways into smaller pieces. (about 6 pieces each log). Roll each piece with breadcrumbs again.
Arrange the pieces on a baking sheet living some gaps in between (at least an inch). Leave them to rise for another 10-15 minutes.
While waiting, preheat oven 370° F /185°C. Bake the Pandesal for 15 minutes or until the sides are a bit browned.
Remove from oven and serve while hot!


Tess says
Very simple steps and does not need to much kneading. Not sweet.
Darlyne says
Made this recipe for the th time 🙂 . Always a hit for breakfast and snacks. I add eden cheese for the filling and super yummy .
M says
Tried it today and it's a really good recipe. My mom and my kids loved it! Much love from NL!
Mydjet Garaygay says
Love the recipe
Arnelia ettner says
Im gonna try to make it tomorrow its a good I dia and it's fun too make it learn something new
Euse says
Great Recipe!! I make this recipe everytime I am making pandesal. It made so good everyone in my family appreciated it.
Leanne Bareng says
Thanks for your recipes
Dylan says
Delicious recipe, just made it. My wife threw the paper with the recipe in the trash so I had to reprint it but oops I forgot to save a pdf so I went to get another copy of the recipe. Well, that link at the top to print the recipe kept redirecting me over and over away from it so I couldn't print it. If you have access to an esc key (not on mobile I guess), then when you see the recipe to print press ESC and now you can print it. You're welcome
Bebs says
Will look into it...Thanks Dylan!
Magi says
Hi, just curious which brand of flour did you use when you were in Germany? I am here to and curious which brand works best. Thanks!
Bebs says
Hi Magi, I am not particular with the brands and normally I just use the cheaper one (from Kaufland). My advice is learn to use one brand and stick to it. Different brands can have different fineness meaning different water absorption.
Rika says
This recipe is amazingly good, 5 stars! I'm using 50% all purpose and 50% bread flour. Since I've tried I've made this recipe with so many filling, ground beef, cheese, sausages, chocolate. So soft until the next day. Thank you so so much for the recipe! You're a star! 😍😍😍
Chel says
This recipe is a keeper. It is soft yet slightly chewy and very light. You can easily eat the whole batch in one sitting.
I used half and half high grade flour and all purpose flour. I let it rise for longer = 2hours the first rising and another hour after dividing them (I was busy and forgot them - it wasnt on purpose). It was very airy inside - I love it.
I made 2 batches. 1 plain and another with cheese and ube halaya inside. They were really good.
I will definitely make this again.
Joy says
Hi! I’ve made this recipe many times - so good!
Just wondering if I can bulk proof in the fridge overnight?
JUFEL SANDRA says
Made it just now. Texture and tast was just perfect👌 im not gonna buy pan de sal at bakeshops anymore😂 i can bake on my own already🤣 thank you for this recipe.🥲
Gigi says
I made this today (the updated recipe) turned out delicious! Thank you for sharing this recipe.
Charity Dimaculangan says
Tried this and did not proof my yeast.. it did not work well for me.
I proofed my yeast first, and it’s soft and good now.
Thank you for helping this “never baked bread in my life” baker enjoy pan de sal!!!
Charles Stiles says
Made this and was pleasantly surprised - the texture and flavor was just like the pandesal I had when I was young! Thank you and I can't wait to try out your other recipes!
Eva says
Thank you for your recepies! They arr always fail proof. My mom was soo happy when I made this for her. Thank you for connecting me and my mother by sharing your recepy! <3
Di says
Great recipe . I’d tried several recipes but none of them shines for me. I am frustrated already coz I waisted a lot of ingredients but am so happy that I found your recipe. I tried and bang on… it’s awesome. My family loves it. I’ll be adding this recipe to my file. Thank you for sharing and God bless you🙏
Bernadette Oneill says
Tried your recipe during lockdown & was so good. Thanks Foxyfolksy! Will try making it again. ☺👍🍞🥖🥐
Maribel says
The best recipe of all time. Baiking these for 5 times and it just so soft and good
Miriam Anderson says
Tried these at a farmers market once and have been dying to have them again since. This recipe taste exactly like I remembered them! I did the 50/50 APF and BF!!! Will save them as a staple in my house. They are so easy to make too. It’s a forgiving recipe and done in 1.5 hours. I used a standard packet of instant fast acting yeast.
Thank you!!!
Aejay says
Thank you for sharing this recipe! Legit soft and fluffy pandesal. I had to convert the ingredients to grams to make it accurate (I write the recipe down so that I can make it consistently next time and if I feel like I need to adjust something, I will know what to do next time). My dough turned out to be really sticky after kneading it for 8-10mins with a hand mixer and it made me frustrated to the point where I want to throw it way. But I don’t want to waste it so added a few more flour and continued what I am doing *trust the process** it was still sticky, I am overthinking.. so I let it rest, I divided it, gave it another rest and baked it. Surprisingly, the end product was so delicious. My 6yo picky eater loved it! My mom believed in me before I believed myself. We all loved it! This recipe is definitely a keeper.
Jeff Shaw says
I've been working on different Pandesal recipes for months. This one is the best. For this batch I used 1/3 bread flour and 2/3 AP flour. Next week, I'll just use AP flour. Salamat po sa recipe kayo. Ang masarap yan!
Sally Barry says
I haven't made this. Yet. But the recipe sounds delicious, and do-able... Our farmers market sells them for $$ and they are SO delicious, I think I might want to try my hand.
Nora says
I'm so glad I found your Pandesal recipe. I made this several times now and it's always perfect. My hubby love them so much everytime it comes out of the oven 3 pieces is gone😊
David says
I follow the recipe as given to make these for my Daughter who loved eating them while we were in Philippines and she equally loved these too. My Filipino wife and mother-in-law also commented that they looked and tasted authentic. Thanks for the recipe
April says
Hi po. Do you still have the brands of the ingredients you used in Germany? I'm currently here and honestly i don't know which brand to use. There's so many choices.
Bebs says
I usually just use the cheapest brand, they are good quality already also.
Maricel says
Thank you for sharing this recipe 😋
Alma Villadsen says
Its easy and yummy🥰
Lou lou says
I made this today! It was perfect, very soft & chewy. I did the 50/50 recipe. I am so glad I give it a try. My son ate 3 pieces. Next time I will make this again, I will make sure that the sizes are equal 😜 I think I need to use a scale to make sure that they are the same. But the tastes are really good. Thanks for sharing this recipe ❤️❤️❤️
Adlyn says
Delicious! Used bread flour and needed to increase quantity of flour! And I also used 12 cavity mini loaf pans to give it a uniform shape.
Dorothy Jehn Oraiz says
This recipe is fun and easy to do, thank you ❤️. Hopefully my mom's coworkers will love these pandesal🤞.
Des says
I overlooked the additional1TBS of sugar and only left it at 1/4 C of sugar. (I measure everything in grams so I only converted the 1/4 C). After I removed them from the oven and had my first bite, the first thing I said was : “This needs more sugar!”
I re-read the recipe and found my error.
Had I added the 1 TBS, it may have just reached the beginning of the sweet spot.
Other than my omission, they turned out beautifully. I used half German APF and half Bread flour. The size was perfect. The density and chew was perfect. I now have 10 biscuits that need more sugar though!!!!
I will make this again (correctly) for my Filipina mother in law.
Bebs says
It happens to all of us, sometimes, Des.😊 Hope your mom-in-law will like it.
Alice Örtegren says
Thank you for sharing your recipe. My family love my pandesal. God Bless ❤️
Alice says
Hi Bebs,
Tried ur pandesal recipe. My husband and daughter loves it. Thanks for sharing it.
Linda says
Hi, I am getting ready to make these for the first time, my ? to you is how do you make those butter tubes. I think that would be over the top 🙂
Bebs says
I actually just used a bread knife ( you can also use a serrated knife) and make sure the butter is cold but not frozen or hard. Then slice a thin layer off the top moving towards you. It should curl up while you continuously cut the butter. You can dip the knife in hot water and dry it to make it slice easier.
Leona So says
I am a European married to an Asian made PandeSal twice going for the 3 times right now, my husband is so pleased with the recipe, we live in Belgium no-one knows PandeSal unless you are an Filipina, but I am not so for me it was getting used to the sweetness of the rolls. Great recipe.
Aldrin says
perfect recipe! wife and kids can’t get enough. can’t wait to try the ensaymada and spanish bread recipes.
Mgal says
This recipe is perfect. Soft and flavorful.
Jennie says
Great recipe! I made the dough in my bread machine. I used ALL bread flour. I was afraid it would get hard after it cooled but it stayed soft in an air-tight container. Love, love, love the chewiness of the pandesal. It made 12 huge pieces as big as hamburger buns so I think I will make it smaller, 24 pieces. I used panko, Japanese bread crumbs since this is what I had.
Leyla says
Tasty recipe and easy to follow videos!
Looking forward for more recipes 😀
Dazel says
Thank you for this recipe! Followed it to a T and came out perfect. Day 4 since I made my first try and they’re still soft! God bless you! Thank you for sharing your recipes!
rose says
Hi Beb
made this receipe its nice but not fluffy as its suppose to be dough is extremely sticky dont know what went wrong🤦♀️
i will try again coz we love your receipes 🥺🥺
Bebs says
Check your measurements again. Maybe you put too much liquid or too less flour? You can always add a bit more flour if it is way too sticky.
Joyce says
How long do I need to knead the dough if I use a mixer?
Bebs says
I would say, perform the windowpane test to be sure. It varies depending on the speed and other factors.
Liza says
Thanks for this recipe. My whole family loved iit!
Question: Can I remove egg from this recipe? If so, what can I replace it with? I need to eliminate egg from my diet. Thanks!
Bebs says
Hi Liza, sure you can remove the egg. The bread will not be as soft and fluffy though but it has an appeal of its own just like the rustic pandesal. You may need to adjust by adding more water or oil so it will not bee too dry.
Joe says
Hi foxyfolksy,
I love cooking your recipes