 Before creating your blog you should have now decided on a niche and a name for you blog-to-be and you should already know what kind of platform and host you prefer to have as I have explained on another article. Then it is time to get into the technical side of things on how to create a blog. This is actually the easier part, all you have to do is follow instructions and you will have your WordPress blog up and running in no time.
Here are the things what you should do:
1)Domain Name and Hosting Registration
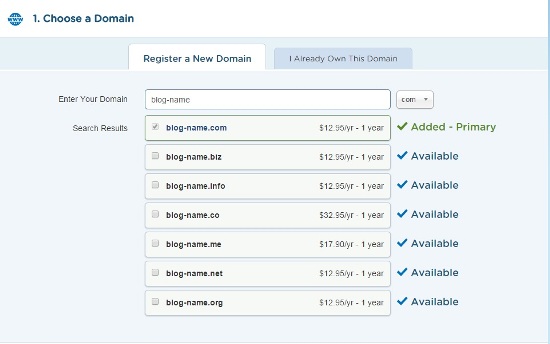
Step 1: After choosing the right name for your blog and checking its availability as a domain name, next is to register it with Hostagtor to be sure that nobody else can use the name you have chosen. Just enter your chosen name and make sure it is shown as available. Proceed to step 2.
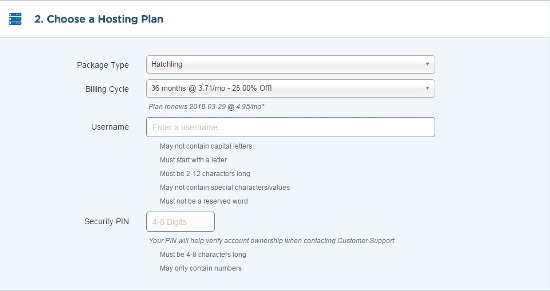
Step 2: Choose the hosting type and billing plan you prefer and create a username and password. For beginners, I would say that the Hatchling plan is good enough and you may choose to upgrade later when you are already generating a lot of traffic. You can pay monthly or choose to pay lumpsum to save money from the one-time discount upon registration.
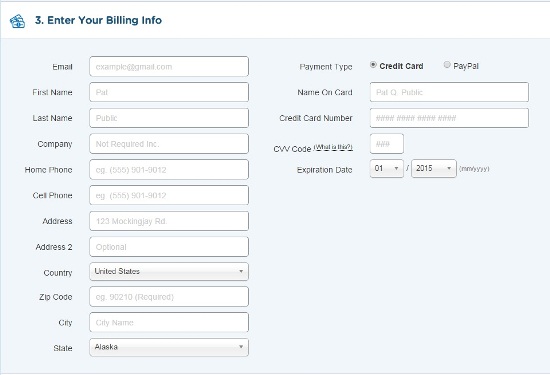
Step 3: Fill the boxes for Billing Information and you may opt to pay via credit card or paypal. You may apply for auto-debit so you do not forget to pay your monthly dues.
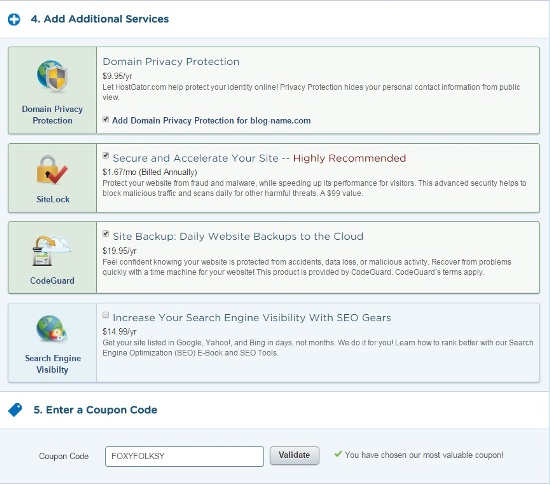
Step 4: Here are just additional services that Hostgator offers. It is entirely up to you if you want to avail any. There is a box also where you can enter a coupon code to avail discounts. Lastly do not forget to review and check the details and the total amount due before checking out. You will also receive an email to verify your registration, all you have to do is click the verification link to approve it.
2)Installing WordPress
Installing WordPress with Hostgator is really easy, all it takes is a few click via QuickInstall .
Step 1: First you have to log into your CPanel. What is CPanel and where can I find it, you might ask. This was my questions too when I was starting. But no panic, just wait or look for the welcome email from Hostagor they sent on the email address you provided them in the billing info. This will include a link to you CPanel together with your username and password. I suggest you save the page to your favorites for future use and also to change the password to something you will easily remember.
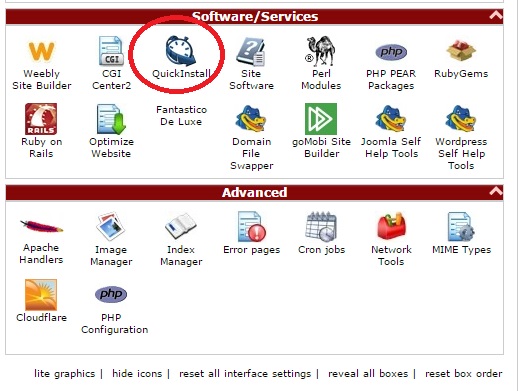
Once logged-in, scroll down to Software/Services section and look for the QuickInstall icon and click it.
Step 2: It will bring you to the QuickInstall Window. Now look for WordPress and click it. Then a message will show on the right, just click 'continue'.
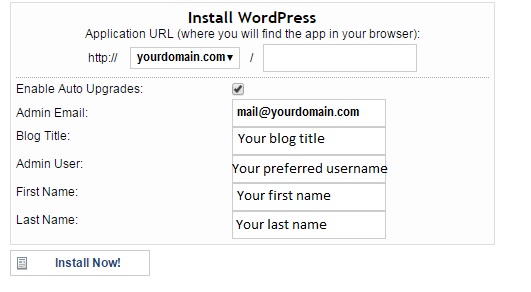
Step 3: Fill the boxes and click 'Install'.
Step 4: After it is done installing you will get a 'congratulations' message like below. Click the link and it will bring you to your newly installed WordPress. 
Step 5: Your admin password will be emailed to you at the email address you provided above. Retrieve your password and then visit the URL to which you installed WordPress, adding/wp-admin (e.g.http://YOURDOMAIN.com/wp-admin) Enter your username and password and you are officially logged-in to your brand new blog

3)Choosing Theme
Congratulations! You are now an owner of brand new blog. But before you start blogging away, first thing to do is to choose a theme for your Blog. This is really important as this will be the overall look and feel of your blog. Choosing a theme is fun as there are lots of free WordPress themes you can choose from, browse the options here. If you would rather opt to have a premium theme for your blog, here are also some of the best choices for themes, check them out and try the live demos and see what they offer:
- Elegant Themes offers a lot of great themes with clean and elegant designs to choose with reasonable prices.
- The Genesis Framework. I know a lot of great blogs using the Genesis Framework. It is usually loved for its simplicity. You have to purchase the framework and a child theme but you only pay for it once and no yearly fee. There are also other themes offered by StudioPress Themes to choose from.
- Another good place to look for good themes is the ThemeIsle which has become quite popular. They have really cool and pretty theme with really affordable prices and some are even free.
If you are wondering what is the difference between free and premium themes, well free WordPress theme is of course good because it is free, and there are some really good free themes out there, the major set back is that, some theme developers do not make updates on their themes while Wordpress continuously update technology and that might cause a problem if your theme is no longer compatible with it. There is also the fact that your blog will look like other blogs using the same theme, but of course you are able to customize your theme, depending how much your chosen theme will allow you to, unless you are into technical stuff and are willing to learn to some CSS and HTML to tinker with your theme (Important Note! Create a child theme first if you plan to do this). Most if not all premium themes come with an easy panel for configuring your theme settings. Support is of course also so much better with a paid theme. But as I said there are really good free themes as well.
You have to choose which design you think will represent your blog and what kind of style you want. However, design is not everything there are also some technical issues to consider in choosing a good theme. Here are some basic pointers I came up with in choosing the right theme for you.
1. Avoid themes that are poorly coded. Later on you will have to learn how to optimize your site for search engines (Search Engine Optimization or SEO) and as early as now, it will be good for SEO to have a theme with valid HTML coding. Although not all HTML errors are harmful but some of them can be fatal, so it is a better to make sure that you have no HTML violations in your site. Mark-up Validation Service by W3C is a tool that can help you check if the theme you like have valid HTML codes. To use this, go to the live demo of the theme of your choice. Copy the URL from the live demo of the theme and paste it in the Address box provided then press validate. It will show the if your theme passed the test or how many errors it contains.

2.Check for malicious or unwanted code. Another tool that comes in handy is the TAC -Theme Authenticity Checker. It is a free plug-in that checks for potentially malicious or unwanted codes that may be added to a free theme. You have to install and activate the plug-in to be able to use it.
3.Responsiveness. These days, it is imperative that your site can be easily viewed in any gadget like smart phones and tablets. So it is important to choose a theme that is responsive. That means that its design can adapt to any browser size.
4.Customization friendly. For beginners without CSS and HTML knowledge, like me when I was only starting with my blog, or not so tech-savvy or just does not have the time to do the work, it will be easier to look for a theme that is easily customizable. A lot of themes, free and premium, have loads of custom and styling options enabling you to design a site the way you like it.
5. Speed. Having fast loading page is of course optimal for any blog or website as some audience are not patient enough to wait for a page that needs to load for some time. Not only that, it is also good for SEO. Themes that are loaded with features and uses full width images and backgrounds may take longer to load. To test a theme's loading speed, go to Pingdom and enter the URL from the demo site of the theme and see how long it takes to load.
Disclaimer: Please note that some of the links from this page may be affiliate links and I will earn a commission if you purchase through these links. But rest assured that I only recommend them thru my personal experience because I find them trustworthy and helpful.


